Introdution of Chicken Momos Recipe
If you love momos but don’t want to make dough, roll wrappers, or spend time folding each dumpling, this chicken momos recipe is for you. These easy homemade chicken momos are made without traditional momo wrappers. Instead, a flavorful chicken mixture is shaped into balls, coated, and cooked in two delicious ways.
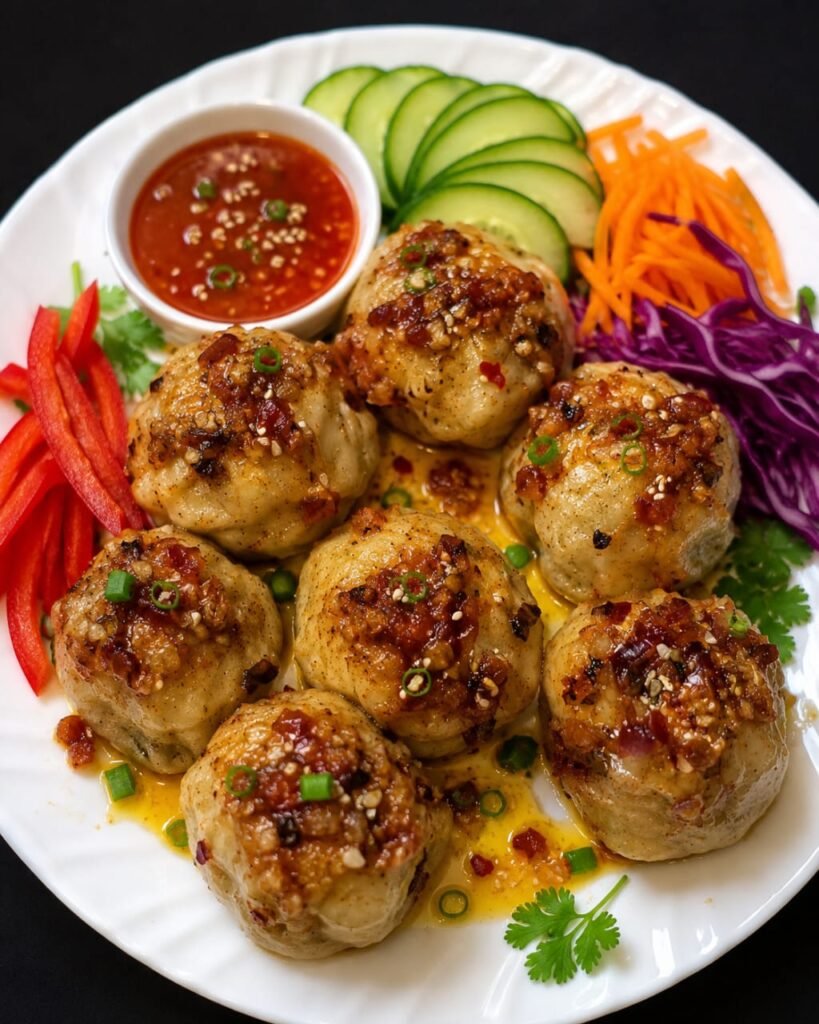
Half of the chicken momo balls are steamed until tender, while the other half are boiled and then cooked in homemade chili oil until beautifully crispy. The result is two completely different textures from the same flavorful chicken mixture.
The homemade chili oil adds a spicy, savory, slightly sweet flavor that makes the crispy version especially delicious.
Why You’ll Love This Chicken Momos Recipe
- No dough, rolling, or complicated folding required
- Easy chicken momo balls made with simple ingredients
- One mixture gives you two delicious cooking options
- Soft and tender steamed momos
- Crispy and spicy chili-oil momos
- Homemade chili oil adds incredible flavor
- Perfect for snacks, appetizers, or a fun weekend meal
Ingredients for Chicken Momos Recipe
Chicken Momo Mixture
- 500 g chicken mince
- 1 medium onion, finely chopped
- ½ medium bell pepper, finely chopped
- 2–3 green chilies, finely chopped
- 1 cup finely chopped cabbage
- 1 tablespoon soy sauce
- 1 tablespoon chili sauce
- 1 teaspoon Worcestershire sauce
- 1 teaspoon ginger powder
- 1 teaspoon garlic powder
- ½–¾ teaspoon salt, or to taste
Homemade Chili Oil
- ⅓ cup cooking oil
- 1 small onion, finely chopped
- 3–4 garlic cloves, finely chopped
- 1–2 tablespoons crushed red chilies, or to taste
- 1 teaspoon coriander seeds
- 1 teaspoon sesame seeds
- 1 tablespoon chili sauce
- 1 teaspoon brown sugar
Coating
- 1 cup all-purpose flour
- ½ cup cornflour
- ½ teaspoon salt
- Chilled water, as needed for dipping
Tip: Because onion, bell pepper, green chilies, cabbage, and sauces all vary in moisture and saltiness, you can adjust the quantities slightly according to the consistency and taste of your chicken mixture.
How to Make the Chicken Momo Mixture
1. Prepare the Vegetables
Finely chop the onion, bell pepper, and green chilies. Squeeze out as much water as possible from the chopped vegetables before adding them to the chicken mince.
This step is important because excess moisture can make the chicken mixture too soft and difficult to shape.
Finely chop the cabbage as well.
2. Mix the Chicken Filling
Add the squeezed onion, bell pepper, and green chilies to the chicken mince. Add the chopped cabbage, soy sauce, chili sauce, Worcestershire sauce, ginger powder, garlic powder, and salt.
Mix everything thoroughly until the ingredients are evenly distributed throughout the chicken.
3. Shape the Chicken Momo Balls
Take small portions of the mixture and shape them into smooth, bite-sized balls.
Place the prepared balls on a plate or tray and refrigerate them in the freezer for about 30 minutes. This helps the balls firm up and makes them easier to coat.
How to Make Homemade Chili Oil
- While the chicken momo balls are chilling, prepare the chili oil.
- Add finely chopped onion, chopped garlic, crushed chilies, coriander seeds, sesame seeds, chili sauce, and brown sugar to a heatproof bowl.
- Heat about ⅓ cup of oil until hot. Carefully pour the hot oil over the mixture and stir well.
- The hot oil releases the aroma from the chilies, garlic, onion, seeds, and spices, creating a flavorful homemade chili oil.
- Taste and adjust the chili, sauce, salt, or sweetness according to your preference.
How to Coat the Chicken Momo Balls
- In one bowl, combine all-purpose flour, cornflour, and salt.
- Keep another bowl filled with chilled water.
- Take one chilled chicken ball and coat it thoroughly in the flour mixture. Dip it briefly into the chilled water, then coat it again with the flour mixture.
- Repeat this flour → chilled water → flour process three times.
- For a thicker and crunchier coating, you can repeat the process one additional time.
- Make sure each ball is evenly coated before cooking.
How to Make Steamed Chicken Momos
- Divide the coated chicken momo balls into two portions.
- For the first half, arrange the coated balls in a steamer, leaving some space between them.
- Cover and steam until the chicken is completely cooked through and the coating is tender.
- Serve the steamed chicken momos hot with your homemade chili oil or your favorite momo dipping sauce.
How to Make Crispy Chicken Momos
- For the second half, bring a pot of water to a boil.
- Carefully add the coated chicken momo balls and boil for about 5–7 minutes, or until the chicken is cooked through.
- Remove them from the water and allow any excess water to drain.
- Now heat a pan and add your prepared chili oil according to your taste. Add the boiled momo balls and cook them over medium heat, turning gently so they become golden and crispy on the outside.
- Continue cooking until the coating reaches your preferred level of crispiness.
- The result is a delicious combination of a crispy exterior, juicy chicken center, and spicy homemade chili-oil flavor.
Steamed vs. Crispy Chicken Momos Recipe
Steamed Chicken Momos
The steamed version is soft, tender, and juicy. It is a great option if you prefer a lighter cooking method while still enjoying all the flavors of the chicken mixture.
Crispy Chicken Momos
The crispy version is more indulgent, with a golden coating and a spicy, flavorful finish from the homemade chili oil. It is perfect when you’re craving something crunchy and extra flavorful.
Tips for Perfect Chicken Momos
Squeeze the Vegetables Well
Onion, bell pepper, and green chilies contain a lot of moisture. Squeezing out their excess water helps the chicken mixture hold its shape and makes the momo balls easier to handle.
Chill the Chicken Balls
Don’t skip the 30-minute freezer step. Chilling helps firm up the chicken balls before coating and cooking.
Use Chilled Water for the Coating
Chilled water helps create a better coating and makes it easier to build multiple layers.
Adjust the Coating Thickness
Three coating rounds give you a good layer of coating. If you prefer extra-thick and crunchy momos, repeat the coating process one more time.
Adjust the Chili Oil to Your Taste
The homemade chili oil can be made mild, medium, or extra spicy. Adjust the crushed chilies, chili sauce, and brown sugar according to your preference.
Cook the Chicken Thoroughly
Whether steaming or boiling before crisping, make sure the chicken is completely cooked before serving.
Common Mistakes to Avoid
Leaving Too Much Moisture in the Vegetables
Excess liquid from the onion, bell pepper, and green chilies can make the chicken mixture too wet. Squeeze the vegetables well before mixing them with the chicken.
Skipping the Chilling Step
Shaping the balls and immediately coating them can make them harder to handle. Chilling them for about 30 minutes helps them firm up.
Making the Coating Too Thin
If you want a noticeable crispy coating, repeat the flour and chilled-water process at least three times.
Overcooking the Chicken
Keep an eye on the cooking time. Once the chicken is fully cooked, avoid unnecessary additional cooking that can make the inside dry.
Adding Too Much Chili Oil
Chili oil is flavorful and spicy, so start with a moderate amount and add more according to your taste.
What to Serve With Chicken Momos
These chicken momos are delicious with:
- Homemade chili oil
- Spicy momo chutney
- Chili garlic sauce
- Soy sauce
- Fresh cucumber salad
- Pickled vegetables
The spicy and crispy version pairs especially well with a cool, fresh side salad.
How to Store Chicken Momos
If you have leftovers, allow them to cool before placing them in an airtight container in the refrigerator.
For the best texture, reheat the steamed momos gently. Crispy momos are best reheated in a pan so the outside can become crisp again instead of turning soft.
Frequently Asked Questions
Q: Are these traditional chicken momos?
A: These are a simplified, no-dough version of chicken momos. Instead of making traditional wrappers and folding dumplings, the seasoned chicken mixture is shaped into balls and coated before cooking.
Q: Can I make the chicken momo balls ahead of time?
A: Yes. You can prepare and shape the chicken balls ahead of time and chill them before coating and cooking.
Q: Why do I need to squeeze the vegetables?
A: Squeezing the onion, bell pepper, and green chilies removes excess moisture, which helps the chicken mixture stay firm and makes the balls easier to shape.
Q: Can I make the coating thicker?
A: Yes. The recipe uses three rounds of flour, chilled water, and flour. For a thicker coating, repeat the same process one additional time.
Q: Can I make the momos less spicy?
A: Absolutely. Reduce the crushed chilies and chili sauce in the chili oil according to your preference.
Q: How long should I boil the momos?
A: The recipe calls for boiling them for approximately 5–7 minutes, but cooking time can vary depending on the size of the chicken balls. Always make sure the chicken is fully cooked before serving.
If you enjoy this snack you must try our chicken tikka in air fryer as wellhttps://recipebloomkitchen.com/chicken-tikka-recipe/
Conclusion
This chicken momos recipe is an easy and fun alternative to traditional dough-wrapped momos. You don’t need to knead dough, roll wrappers, or spend time folding individual dumplings. Simply prepare the flavorful chicken mixture, shape it into balls, coat them, and choose your favorite cooking method.
Keep half of the batch steamed for soft and tender chicken momos, or boil and cook the other half in homemade chili oil for crispy chicken momos with a spicy, crunchy finish. With a flavorful chicken filling and customizable homemade chili oil, this recipe gives you two delicious ways to enjoy momos at home.